---
date: Generated on 2025-05-05
title: Sysadmin Guide
---
# Sysadmin
Welcome to the installation guide for Analytics Platform (AP from now
on). This document is intended for system administrators who will be
setting up and maintaining the environment required to run AP.
AP requires a Linux operating system. An Ubuntu LTS version is the
recommended Linux distribution. The installation guide assumes *Ubuntu
Linux* as the operating system and the availability of the *systemd*
process and service manager.
AP supports a variety of public cloud providers, data storage and data
warehouses. It can be deployed in a public cloud environment, and on
Linux-based, on-premise server environments.
## Data platform
AP uses a data storage provider to ingest and store raw data files from
multiple sources in its native format. The following data storage
environments are supported.
Infrastructure Data storage Data warehouse
---------------- -------------------- -----------------
AWS Amazon S3 ClickHouse
AWS Amazon S3 Amazon Redshift
Azure Azure Blob Storage SQL Database
Azure Azure Blob Storage Synapse
On-prem Local filesystem ClickHouse
On-prem Local filesystem PostgreSQL
On-prem Local filesystem SQL Server
### Data storage
AP supports three providers for data storage:
- Amazon S3
- Azure Blob Storage
- Local filesystem
*Amazon S3* and *Azure Blob Storage* are scalable, highly durable and
cost-effective public cloud storage service that allows users to store
and retrieve any amount of data from anywhere on the web. These services
integrate well with the vast ecosystem of data services in the AWS and
Azure public clouds respectively.
*Local filesystem* refers to using a regular server with attached disk
storage. This approach leverages the file system of the server and data
files are stored in regular directories. As high-speed reading is not a
priority, HHDs (Hard Disk Drives) is a cost-effective and feasible
option, as opposed to more expensive and faster SSDs (Sold State
Drives).
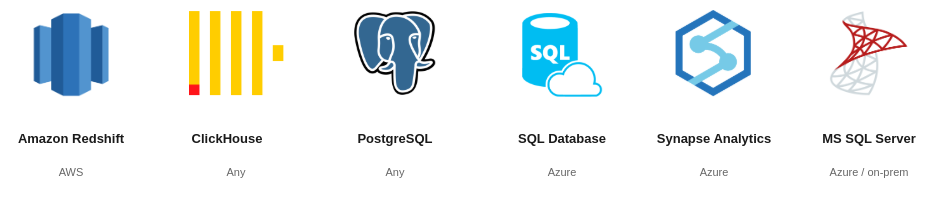
### Data warehouses
- ClickHouse
- Amazon Redshift
- Azure SQL Database
- Azure Synapse
- PostgreSQL
- Microsoft SQL Server
In on-premise environments, ClickHouse is the preferred data warehouse,
due to its open source license, well-documented server installation and
high-perforance data ingestion and data querying.
## Middleware
Below is a summary of the necessary middleware components that your
system needs to ensure optimal performance and compatibility.
- **OpenJDK 17:** A robust and widely-used open-source implementation of
the Java Platform which provides the runtime environment necessary for
running Java applications. The AP backend services are written in Java
17.
- **PostgreSQL:** Version 14 or later. A powerful, open-source
relational database management system that offers advanced features
such as complex queries, foreign keys, triggers, and up-to-date
compliance with SQL standards. The AP backend services use PostgreSQL
databases for persistence of data.
- **nginx:** A high-performance, open-source HTTP server and reverse
proxy that is essential for handling web traffic, load balancing, and
serving static content efficiently.
- **Redis:** An in-memory, open-source key-value store that provides
lightning-fast data retrieval, making it ideal for caching and
supporting real-time analytics, session management, and message
brokering.
- **Apache Pulsar:** An open-source distributed messaging and streaming
platform that enables reliable, scalable, and low-latency data
streaming and message queueing, suitable for event-driven
applications.
- **ClickHouse:** A high-performance, open-source columnar database
management system designed for online analytical processing (OLAP) and
real-time data analytics at scale. AP utilizes ClickHouse as data
warehouse for analytical data processing and querying.
AP is based on several independent services.
- **API Gateway:** The API gateway is responsible for routing API
requests to the appropriate backend service. It manages authentication
and user sessions.
- **Identity:** The identity service is responsible for security,
authentication, authorization, and for user and client management.
- **Data pipeline:** The data pipeline service is the main component of
AP and is responsible for data catalog, data pipelines, views,
destinations, workflows, data quality checks.
- **Web UI:** The UI is composed of two web apps written in React and
Javascript: The analytics platform web app and the user management web
app.
AP is deployed as executable JAR files, managed by the systemd system
and process manager. A Docker image is planned for but not currently
available.
## Software architecture
AP is a multi-tenant and web-based software. Multi-tenancy is an
application architecture where a single instance of the software serves
multiple "tenants", also known as clients or organizations. Each
tenant's data and configuration are isolated, ensuring security and
privacy, but they all share the same underlying infrastructure and
codebase. This approach allows for efficient use of resource, as the
software instance can be maintained and updated centrally while still
catering to the unique needs of different tenants. For an on-premise
installation scenario used by a single organization, a single tenant can
be configured, alternatively, individual tenants for development,
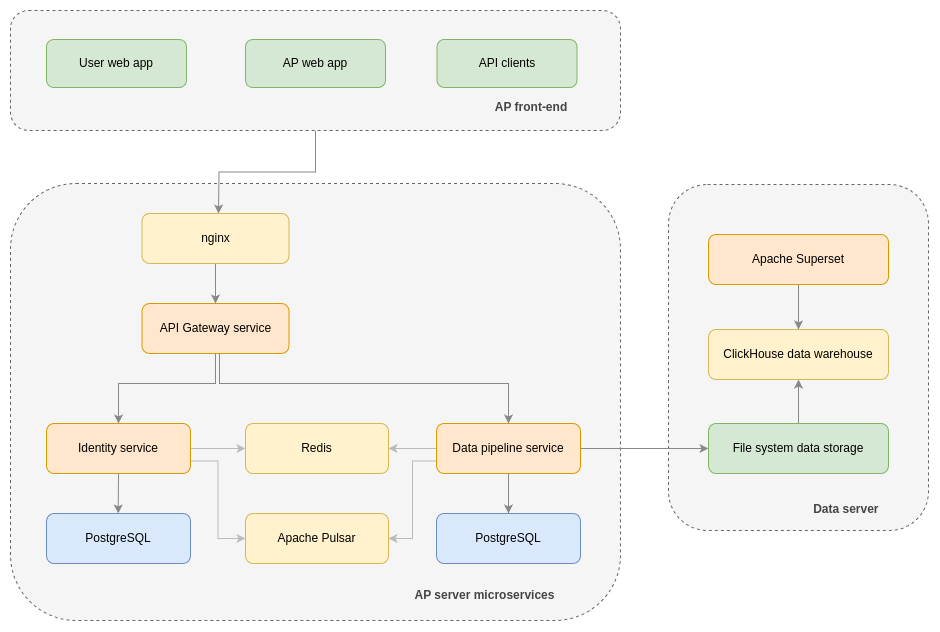
testing and production. The high-level architecture of the AP is
described in the below diagram.
## Network architecture
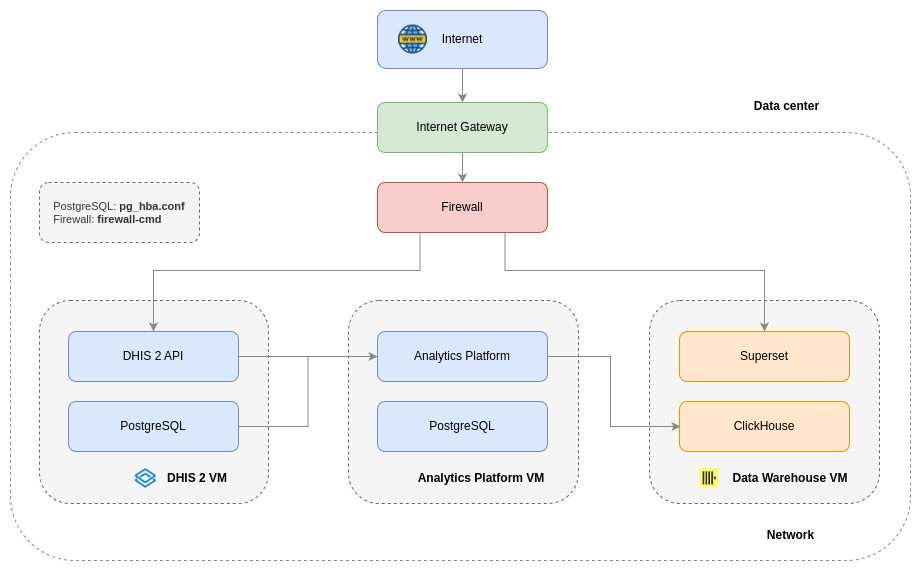
AP network architecture for on-prem hosting environments is described in
the diagram below, which shows a typical example with a DHIS2 instance
as data source, AP multi-tenant service and tenant-specific data storage
and data warehouse.
## Tech stack
The AP software is built using a client-server architecture, where the
client (front-end) communicates with the server (backend) over a REST
HTTP API.
- Database: The transactional database for metadata storage is
PostgreSQL.
- Backend: Backend services are written in Java using OpenJDK 17. Major
frameworks are Spring Boot, Hibernate and Apache Commons.
*Testcontainers* and *JUnit* are used for unit and integration
testing.
- Front-end: The front-end web apps are written in Javascript with the
React framework and Ant Design UI library.
# Hosting requirements
AP can be deployed on-premise or in the AWS and Azure public clouds. It
can be deployed entirely on a single virtual machine (VM), or by
deploying the various services on separate VMs, such as the PostgreSQL
transactional database, AP software services, ClickHouse data warehouse
and Apache Superset data exploration tool. For an on-premise deployment
on a single VM, the following requirements apply.
## Hardware
- Virtual machine or physical server
- Linux operating system, Ubuntu 22.04 or 24.04 LTS recommended
- 32 GB RAM
- 8 CPU, ideally 16 or 32 CPU
- 500 GB disk, ideally SSD
## Network
- 300 Kbps network bandwith per user
- 1 Gbps network transfer between servers (if more than one)
## Installation
- Internet connection with public IP address
- SSH external access
- Terminal root access
- Domain name
- SSL certificate
- SMTP email server
- Backup strategy for local and off-site backups
- Monitoring of uptime and alerting for downtime
- Vulnerability scan and security hardening
# Middleware installation
This guide covers installation of required middleware for the Analytics
Platform (AP). This guide assumes Ubuntu Linux 22.04 LTS is used as the
operating system and that the reader has some familiarity with Linux and
terminals. The text editor used is `nano`.
Please consider the following:
- There are many approaches to hosting a Java-based application such as
AP. This guide outlines one of them.
- Topics including security hardening and backup strategy are important
but beyond the scope of this guide.
- There may be several managed cloud middleware offerings available.
This guide is focused on the on-premise installation scenario.
## OpenJDK 17
Start by updating the operating system packages.
``` sh
sudo apt update && sudo apt upgrade -y
```
Install OpenJDK version 17.
``` sh
sudo apt install -y openjdk-17-jdk
```
## PostgreSQL 14
Install PostgreSQL version 14. Note that later versions of PostgreSQL
are supported. The installation of PostgreSQL is well covered in online
installation guides.
``` sh
sudo apt install -y postgresql-14
```
The PostgreSQL service is enabled on boot by default after installation.
Verify the status of the PostgreSQL process.
``` sh
sudo systemctl status postgresql
```
Set the PostgreSQL authentication method to `md5`.
``` sh
sudo nano /etc/postgresql/14/main/pg_hba.conf
```
Make sure the authentication method is set to `md5` for localhost
connections, typically by modifying the two last lines.
``` properties
host all all 127.0.0.1/32 md5
host all all ::1/128 md5
```
Adjust performance settings by creating a new configuration file.
``` sh
nano 10-perf.conf
```
``` properties
# PostgreSQL performance settings
max_connections = 100
shared_buffers = 768MB
work_mem = 16MB
maintenance_work_mem = 256MB
temp_buffers = 16MB
effective_cache_size = 2GB
checkpoint_completion_target = 0.8
wal_writer_delay = 1s
random_page_cost = 1.1
max_locks_per_transaction = 1024
track_activity_query_size = 8192
```
Set owner and permissions for the configuration file, and move it to the
PostgreSQL configuration directory.
``` sh
sudo chown postgres:postgres 10-perf.conf
```
``` sh
sudo chmod 644 10-perf.conf
```
``` sh
sudo mv 10-perf.conf /etc/postgresql/14/main/conf.d
```
Restart PostgreSQL to have changes take effect.
``` sh
sudo systemctl restart postgresql
```
## nginx
Install nginx.
``` sh
sudo apt install -y nginx
```
The nginx service is enabled on boot by default after installation.
Verify the status of the nginx process.
``` sh
sudo systemctl status nginx
```
Configure a proxy cache inside the `http` element of the nginx config.
``` sh
sudo nano /etc/nginx/nginx.conf
```
``` nginx
http {
proxy_cache_path /var/cache/nginx levels=1:2 keys_zone=ap:20m inactive=1d;
}
```
Configure nginx by creating a file `analytics-platform.conf` and place
it in the nginx `sites-available` directory.
``` sh
sudo nano /etc/nginx/sites-available/analytics-platform.conf
```
Configure nginx with SSL and static web app UI served from Amazon S3.
- SSL and certificate configuration are left out, and should be
configured appropriately.
- The `apigateway`, `web` and `identity` services are defined as
*upstreams* and referred to later in the config.
- The manager and user web apps are served from Amazon S3.
- Additional security hardening may be appropriate in a production
environment.
- Update `server_name` from `ap.mydomain.org` to match your environment.
``` nginx
# Upstream
upstream apigateway {
server 127.0.0.1:8085;
}
upstream web {
server 127.0.0.1:8081;
}
upstream identity {
server 127.0.0.1:8086;
}
# Redirect HTTP to HTTPS
server {
listen [::]:80;
listen 80;
server_name ap.mydomain.org;
return 301 https://$host$request_uri;
}
# HTTPS server
server {
listen [::]:443 ssl;
listen 443 ssl;
server_name ap.mydomain.org;
# Compression
gzip on;
gzip_types application/json application/javascript text/javascript text/css text/plain;
# Includes for the default hostname
include default.d/*.conf;
# Includes for the default hostname under HTTPS
include default.d/*-https.inc;
# https://developer.mozilla.org/en-US/docs/Web/HTTP/X-Frame-Options
add_header X-Frame-Options DENY;
# https://developer.mozilla.org/en-US/docs/Web/HTTP/CSP
add_header Content-Security-Policy "frame-ancestors 'none';";
# Enable Strict Transport Security (HSTS) for https
add_header Strict-Transport-Security "max-age=31536000" always;
# Root URL rewrite to login page
location = / {
return 301 http://$host/manager/;
}
# Proxy settings
proxy_set_header host $http_host;
proxy_set_header x-forwarded-host $host;
proxy_set_header x-real-ip $remote_addr;
proxy_set_header x-forwarded-for $proxy_add_x_forwarded_for;
proxy_set_header x-forwarded-proto $scheme;
proxy_set_header x-forwarded-port $server_port;
proxy_buffer_size 128k;
proxy_buffers 8 128k;
proxy_busy_buffers_size 256k;
# Proxy forwards
# Login check and logout
location /login_check {
proxy_pass http://identity/login_check;
}
location /session_logout {
proxy_pass http://identity/session_logout;
}
# App
location ~* ^/(app|doc|node_modules) {
rewrite ^/(.*) /$1 break;
proxy_pass http://web;
}
# Manager web app to Amazon S3
location /manager {
proxy_intercept_errors on;
proxy_set_header X-Real-IP $remote_addr;
proxy_set_header X-Forwarded-For $proxy_add_x_forwarded_for;
proxy_hide_header x-amz-id-2;
proxy_hide_header x-amz-request-id;
proxy_pass http://bao-cloud-manager-prod.s3-website-us-east-1.amazonaws.com/manager;
proxy_cache ap;
}
# User web app to Amazon S3
location /users {
proxy_intercept_errors on;
proxy_set_header x-real-ip $remote_addr;
proxy_set_header x-forwarded-for $proxy_add_x_forwarded_for;
proxy_hide_header x-amz-id-2;
proxy_hide_header x-amz-request-id;
proxy_pass http://bao-cloud-manager-prod.s3-website-us-east-1.amazonaws.com/users;
proxy_cache ap;
}
# Increased max upload size and timeout for file upload API endpoints
location /api/dataPipelines {
proxy_pass http://apigateway/api/dataPipelines;
client_max_body_size 2048M;
proxy_read_timeout 600;
proxy_connect_timeout 600;
proxy_send_timeout 600;
}
# API requests to API gateway service
location /api {
proxy_pass http://apigateway/api;
}
}
```
Enable the server configuration by creating a symlink to the nginx
`sites-enabled` directory.
``` sh
sudo ln -s /etc/nginx/sites-available/analytics-platform.conf \
/etc/nginx/sites-enabled/analytics-platform.conf
```
Remove the default server configuration file.
``` sh
sudo rm /etc/nginx/sites-enabled/default
```
Restart nginx to make changes take effect.
sudo systemctl restart nginx
## Redis
Install redis server.
``` sh
sudo apt install -y redis-server
```
The redis service is enabled on boot by default after installation.
Verify the status of the redis process.
``` sh
sudo systemctl status redis
```
Edit the redis configuration file.
``` sh
sudo nano /etc/redis/redis.conf
```
## Apache Pulsar
### Installation
Install Apache Pulsar using the binary distribution. First, download and
extract Pulsar using `wget`. Alternatively, visit the Apache Pulsar
downloads [page](https://pulsar.apache.org/download/). You may want to
check for a later version of Apache Pulsar.
``` sh
PULSAR_VER="3.3.3"
wget https://archive.apache.org/dist/pulsar/pulsar-${PULSAR_VER}/apache-pulsar-${PULSAR_VER}-bin.tar.gz
tar xvfz apache-pulsar-${PULSAR_VER}-bin.tar.gz
mv apache-pulsar-${PULSAR_VER} apache-pulsar
```
Set root as owner and make binary files executable.
``` sh
sudo chown root:root -R apache-pulsar
```
``` sh
sudo chmod +x apache-pulsar/bin/pulsar*
```
### Configuration
*Optional:* Adjust memory usage by modifying `pulsar_env.sh` .
``` sh
sudo nano apache-pulsar/conf/pulsar_env.sh
```
Set the `PULSAR_MEM` variable and specify memory usage, adjusted to
available server resources.
``` sh
PULSAR_MEM=${PULSAR_MEM:-"-Xms2g -Xmx2g -XX:MaxDirectMemorySize=2g"}
```
*Optional:* Set new port for the HTTP server not to occupy port 8080.
``` sh
sudo nano apache-pulsar/conf/standalone.conf
```
Set the `webServicePort` property to `8098`.
``` sh
webServicePort=8098
```
Move the directory to suitable installation location.
``` sh
sudo mv apache-pulsar /var/lib/apache-pulsar
```
Create a `systemd` service file called `apache-pulsar.service` for
running Pulsar in standalone mode.
``` sh
nano apache-pulsar.service
```
``` properties
[Unit]
Description = Apache Pulsar
[Service]
ExecStart = /var/lib/apache-pulsar/bin/pulsar standalone -nss
[Install]
WantedBy = multi-user.target
```
!!! note The `-nss` flag is set due to Pulsar bug
[5668](https://github.com/apache/pulsar/issues/5668).
Set owner and permissions for the init script.
``` sh
sudo chown root:root apache-pulsar.service
```
``` sh
sudo chmod 644 apache-pulsar.service
```
Move the init script to the `systemd` directory.
``` sh
sudo mv apache-pulsar.service /etc/systemd/system/
```
Reload the `systemd` daemon.
``` sh
sudo systemctl daemon-reload
```
Enable Pulsar on startup.
``` sh
sudo systemctl enable apache-pulsar
```
Start Pulsar.
``` sh
sudo systemctl start apache-pulsar
```
Verify that the Pulsar service is running.
``` sh
sudo systemctl status apache-pulsar
```
View the Pulsar log.
``` sh
sudo journalctl -f -u apache-pulsar -n 400
```
You should now have Pulsar running on port 6650.
To run Pulsar manually.
``` sh
sudo /var/lib/apache-pulsar/bin/pulsar standalone
```
*Troubleshooting:* If Apache Pulsar fails to start due to local data
corruption, a solution is to stop the service, delete the local data
director and start the service. Local data will be lost, however, Apache
Pulsar topics are not persisted and the data directory will be recreated
on next start.
/var/lib/apache-pulsar/data
## Extra
Shorthand notation for installing packages in standard Ubuntu
repositories.
``` sh
sudo apt update && \
sudo apt upgrade -y && \
sudo apt install -y openjdk-17-jdk postgresql-14 nginx redis-server unzip
```
# Analytics Platform installation
This guide covers the installation of the Analytics Platform (AP)
software. The AP backend server is composed of the following services.
- API gateway
- Identity
- Data pipeline
The *key* and *port* of each service are described below. The *key*
refers to the name used in configuration directories and files. The
*port* refers to the default port for which the service will listen for
incoming requests.
Name Key Port
--------------- ------------------- ------
API gateway bao-api-gateway 8085
Identity bao-identity 8086
Data pipeline bao-data-pipeline 8084
## User
Create an operating system user for running the AP services. This guide
uses `bao-admin` as username, though any valid username can be used. The
user has no password. For security reasons, avoiding password-based
login and instead use SSH key-based login is strongly recommended.
``` sh
sudo adduser --disabled-password --shell /bin/bash bao-admin
```
For security reasons, the AP services should not run as a privileged
user. It may however be practical to allow *sudo without password*:
``` sh
sudo usermod -aG sudo bao-admin
sudo echo "bao-admin ALL=(ALL) NOPASSWD:ALL" > /etc/sudoers.d/50-ap-users
```
Create the SSH directory, and add the authorized keys file. Add public
keys for users which should have access.
``` sh
mkdir ~/.ssh
touch ~/.ssh/authorized_keys
chmod 600 ~/.ssh/authorized_keys
```
## SSH
Carefully confirm that public key based authentication to the server is
successful, i.e. login without specifying a password.
Disable password-based authentication for enhanced security. Create a
SSH daemon config file.
``` sh
sudo nano /etc/ssh/sshd_config.d/90-no-passwd-auth.conf
```
Add the following properties.
``` properties
PubkeyAuthentication yes
PasswordAuthentication no
PermitRootLogin prohibit-password
```
Restart the SSH daemon to have the changes take effect.
``` sh
sudo systemctl restart sshd
```
## JAR files
Each service is available as an executable JAR file.
The JAR files should be installed at the following locations.
----------------------------------------------------------------------------
JAR file File location
------------------------- --------------------------------------------------
bao-api-gateway.jar /var/lib/bao-api-gateway/bao-api-gateway.jar
bao-identity.jar /var/lib/bao-identity/bao-identity.jar
bao-data-pipeline.jar /var/lib/bao-data-pipeline/bao-data-pipeline.jar
----------------------------------------------------------------------------
Create the directories manually and make `bao-admin` the owner.
``` sh
sudo mkdir /var/lib/bao-api-gateway
sudo mkdir /var/lib/bao-identity
sudo mkdir /var/lib/bao-data-pipeline
```
``` sh
sudo chown bao-admin:bao-admin /var/lib/bao-api-gateway
sudo chown bao-admin:bao-admin /var/lib/bao-identity
sudo chown bao-admin:bao-admin /var/lib/bao-data-pipeline
```
Place the JAR files in the respective directories and make `bao-admin`
the owner.
``` sh
sudo cp bao-api-gateway.jar /var/lib/bao-api-gateway
sudo cp bao-identity.jar /var/lib/bao-identity
sudo cp bao-data-pipeline.jar /var/lib/bao-data-pipeline
```
``` sh
sudo chown bao-admin:bao-admin /var/lib/bao-api-gateway/bao-api-gateway.jar
sudo chown bao-admin:bao-admin /var/lib/bao-identity/bao-identity.jar
sudo chown bao-admin:bao-admin /var/lib/bao-data-pipeline/bao-data-pipeline.jar
```
## Systemd
The *systemd* service manager is used to manage the service processes.
Each service has a corresponding systemd service file and a
configuration file.
The systemd service files are specified below. The memory allocations
should be adjusted to the available server resources. The systemd
service files should be located in the `/etc/systemd/system` directory.
----------------------------------------------------------------------------------
Systemd file File location
---------------------------------- -----------------------------------------------
bao-api-gateway.service /etc/systemd/system/bao-api-gateway.service
bao-identity.service /etc/systemd/system/bao-identity.service
bao-data-pipeline.service /etc/systemd/system/bao-data-pipeline.service
----------------------------------------------------------------------------------
The `bao-api-gateway.service` systemd service file.
``` sh
sudo nano /etc/systemd/system/bao-api-gateway.service
```
``` properties
[Unit]
Description = AP API Gateway
[Service]
Environment = "JAVA_OPTS=-Xms256M -Xmx512M"
ExecStart = /var/lib/bao-api-gateway/bao-api-gateway.jar
User = bao-admin
[Install]
WantedBy = multi-user.target
```
The `bao-identity.service` systemd service file.
``` sh
sudo nano /etc/systemd/system/bao-identity.service
```
``` properties
[Unit]
Description = AP Identity
[Service]
Environment = "JAVA_OPTS=-Xms1024M -Xmx2048M"
ExecStart = /var/lib/bao-identity/bao-identity.jar
User = bao-admin
[Install]
WantedBy = multi-user.target
```
The `bao-data-pipeline.service` systemd service file.
``` sh
sudo nano /etc/systemd/system/bao-data-pipeline.service
```
``` properties
[Unit]
Description = AP Data Pipeline
[Service]
Environment = "JAVA_OPTS=-Xms1024M -Xmx2048M"
ExecStart = /var/lib/bao-data-pipeline/bao-data-pipeline.jar
User = bao-admin
[Install]
WantedBy = multi-user.target
```
To enable the services on boot, invoke the following commands.
``` sh
sudo systemctl enable bao-api-gateway
sudo systemctl enable bao-identity
sudo systemctl enable bao-data-pipeline
```
To start a service using systemd, after the JAR files and configuration
files are installed, invoke the following command.
``` sh
sudo systemctl start bao-data-pipeline
```
To stop a service using systemd, invoke the following command.
``` sh
sudo systemctl stop bao-data-pipeline
```
## PostgreSQL
The AP identity and data pipeline services use PostgreSQL for
persistence. Note that the PostgreSQL contains metadata for data
pipelines, views and more, while analytical data is stored in a data
warehouse such as ClickHouse. Note that the names given to the databases
and users can be adjusted as preferred, and the following names are
suggestions.
Database name Database user Encoding
----------------- ----------------- ----------
baoidentity baoidentity UTF-8
baodatapipeline baodatapipeline UTF-8
### Users
Create the required users. Switch to the `postgres` user. Connect to
PostgreSQL with the `psql` CLI.
``` sh
sudo su postgres
```
``` sh
psql
```
Create users for the identity and data pipeline services. Replace
`mypassword1` and `mypassword2` with a strong passwords, and take note
securely.
``` sql
create user baoidentity with password 'mypassword1';
```
``` sql
create user baodatapipeline with password 'mypassword2';
```
### Databases
Create databases for the identity and data pipeline services. Set
encoding to UTF-8.
``` sql
create database baoidentity with owner baoidentity encoding 'utf8';
```
``` sql
create database baodatapipeline with owner baodatapipeline encoding 'utf8';
```
Exit the CLI with `Ctrl+D` and then return to the `bao-admin` user with
`exit`.
## Configuration
Each service has a corresponding configuration file.
--------------------------------------------------------------------------------
Config file File location
-------------------------------- -----------------------------------------------
bao-api-gateway.conf /opt/bao-api-gateway/bao-api-gateway.conf
bao-identity.conf /opt/bao-identity/bao-identity.conf
bao-data-pipeline.conf /opt/bao-data-pipeline/bao-data-pipeline.conf
--------------------------------------------------------------------------------
### API gateway
Create the `bao-api-gateway.conf` configuration file for the API gateway
service with `chmod 600`.
``` sh
sudo mkdir /opt/bao-api-gateway
```
``` sh
sudo nano /opt/bao-api-gateway/bao-api-gateway.conf
```
``` properties
# ----------------------------------------------------------
# Service to URI mapping
# ----------------------------------------------------------
# Identity service URI
service.identity = http://localhost:8086/
# Data pipeline service URI
service.datapipeline = http://localhost:8084/
# ----------------------------------------------------------
# CORS
# ----------------------------------------------------------
# Allowed origins for CORS
cors.allowed_origins = https://localhost:3000, \
https://localhost:9000
```
``` sh
sudo chown bao-admin:bao-admin /opt/bao-api-gateway/bao-api-gateway.conf
```
``` sh
sudo chmod 600 /opt/bao-api-gateway/bao-api-gateway.conf
```
### Identity
Create the `bao-identity.conf` configuration file for the identity
service. Adjust usernames and passwords to your environment.
``` sh
sudo mkdir /opt/bao-identity
```
``` sh
sudo nano /opt/bao-identity/bao-identity.conf
```
``` properties
# ----------------------------------------------------------
# Database connection
# ----------------------------------------------------------
# JDBC connection URL
connection.url = jdbc:postgresql://127.0.0.1/baoidentity
# JDBC connection username
connection.username = baoidentity
# JDBC connection password (confidential)
connection.password = xxxx
# ----------------------------------------------------------
# Redis
# ----------------------------------------------------------
# Redis hostname / IP address
redis.hostname = 127.0.0.1
# Redis port, optional, default: 6379
redis.port = 6379
# Redis password, optional
redis.password =
# ----------------------------------------------------------
# Apache Pulsar
# ----------------------------------------------------------
# Pulsar hostname / IP address
pulsar.service_url = pulsar://127.0.0.1:6650
# Pulsar TLS authentication plugin, optional, TLS only
# pulsar.tls.auth.plugin =
# Pulsar TLS certificate path, optional, optional, TLS only
# pulsar.tls.trusts.certs.file.path =
# Pulsar TLS certificate file, optional, TLS only
# pulsar.tls.cert.file =
# Pulsar TLS key file, optional, TLS only
# pulsar.tls.key.file =
# ----------------------------------------------------------
# System
# ----------------------------------------------------------
# System hostname / base URL
system.base_url = https://analytics.mydomain.org
# System application title
system.application_title = Analytics Platform
# Log email invitation URLs, disable in prod, debugging only
system.user_invite.logging = off
# Name of issuer for MFA entries
system.mfa_issuer = Analytics Platform
# ----------------------------------------------------------
# Email
# ----------------------------------------------------------
# From address for outgoing emails
email.from.address = noreply@mydomain.org
# ----------------------------------------------------------
# SMTP
# ----------------------------------------------------------
# SMTP hostname or IP address
smtp.host = 127.0.0.1
# SMTP port, default: 587
smtp.port = 587
# SMTP TLS
smtp.tls = true
# SMTP username
smtp.user = myuser
# SMTP password
smtp.password = xxxx
```
``` sh
sudo chown bao-admin:bao-admin /opt/bao-identity/bao-identity.conf
```
``` sh
sudo chmod 600 /opt/bao-identity/bao-identity.conf
```
### Data pipeline
Create the `bao-data-pipeline.conf` configuration file for the data
pipeline service. Adjust usernames and passwords to your environment.
``` sh
sudo mkdir /opt/bao-data-pipeline
```
``` sh
sudo nano /opt/bao-data-pipeline/bao-data-pipeline.conf
```
``` properties
# ----------------------------------------------------------
# Database connection
# ----------------------------------------------------------
# JDBC connection URL
connection.url = jdbc:postgresql://127.0.0.1/baodatapipeline
# JDBC connection username
connection.username = baodatapipeline
# JDBC connection password (confidential)
connection.password = xxxx
# ----------------------------------------------------------
# Redis
# ----------------------------------------------------------
# Redis hostname / IP address
redis.hostname = 127.0.0.1
# Redis port, optional, default: 6379
redis.port = 6379
# Redis password, optional
redis.password =
# ----------------------------------------------------------
# Apache Pulsar
# ----------------------------------------------------------
# Pulsar hostname / IP address
pulsar.service_url = pulsar://127.0.0.1:6650
# Pulsar TLS authentication plugin, optional, TLS only
# pulsar.tls.auth.plugin =
# Pulsar TLS certificate path, optional, optional, TLS only
# pulsar.tls.trusts.certs.file.path =
# Pulsar TLS certificate file, optional, TLS only
# pulsar.tls.cert.file =
# Pulsar TLS key file, optional, TLS only
# pulsar.tls.key.file =
# ----------------------------------------------------------
# System
# ----------------------------------------------------------
# System hostname / base URL
system.base_url = https://analytics.mydomain.org
# Retain temporary data files (debugging only)
system.retain_temp_files = off
# Sample size for dataset column type detection, default: 5k
system.max_sample_size = 500000
# Email address to send alert messages on error
system.error.alert_email = alerts@mydomain.org
# ----------------------------------------------------------
# Blobstore (local filesystem only)
# ----------------------------------------------------------
# Root directory for local file system blob storage
blobstore.root_dir = /var/lib/bao-data-pipeline/data
# ----------------------------------------------------------------------
# OpenAI [Optional]
# ----------------------------------------------------------------------
# OpenAI API key
openai.api_key =
# OpenAI model, can be 'default', 'gpt-4o-mini', 'gpt-4o', 'o3-mini'
openai.model = default
# ----------------------------------------------------------------------
# Google [Optional]
# ----------------------------------------------------------------------
# API key
google.gemini.api_key =
```
``` sh
sudo chown bao-admin:bao-admin /opt/bao-data-pipeline/bao-data-pipeline.conf
```
``` sh
sudo chmod 600 /opt/bao-data-pipeline/bao-data-pipeline.conf
```
## Encryption
The data pipeline service encrypts all secrets at the database level,
and requires an encryption key to provided.
!!! tip "Note" Store the encryption key in a secure manner!
The encryption key should be stored in a secure and confidential way. If
the key is lost, the encrypted database content cannot be recovered. If
the key is exposed, an attacker could use the key to decrypt the
database secrets.
The *Tink* Java library is used for encryption. An encryption key can be
generated using the tink CLI called *Tinkey*.
The encryption key file name is `bao-data-pipeline-key.json` and the
content is in JSON format.
Download Tinkey from the following URL.
https://developers.google.com/tink/tinkey-overview
Uncompress the tar ball in a suitable location. Generate the key with
the following command.
``` sh
./tinkey create-keyset --key-template AES128_GCM --out-format json
```
Create and store the encryption key file in the data pipeline
configuration directory.
``` sh
sudo nano /opt/bao-data-pipeline/bao-data-pipeline-key.json
```
Example encryption key file.
``` json
{
"primaryKeyId": 0000000000,
"key": [
{
"keyData": {
"typeUrl": "type.googleapis.com/google.crypto.tink.AesGcmKey",
"value": "{secret}",
"keyMaterialType": "SYMMETRIC"
},
"status": "ENABLED",
"keyId": 0000000000,
"outputPrefixType": "TINK"
}
]
}
```
``` sh
sudo chown bao-admin:bao-admin /opt/bao-data-pipeline/bao-data-pipeline-key.json
```
``` sh
sudo chmod 600 /opt/bao-data-pipeline/bao-data-pipeline-key.json
```
## Data cache
When AP ingests data from various data sources, it caches data in the
form of data files, which are temporarily stored on the filesystem of
the server where AP is deployed. Depending on the data sources,
significant storage capacity is required. However, data is deleted when
a data load process completes, meaning the data volume will not grow
over time.
The data cache directory name is `data-pipeline`, and located below the
configuration directory.
/opt/bao-data-pipeline/data-pipeline
Create the directory manually.
``` sh
CACHE_DIR="/opt/bao-data-pipeline/data-pipeline"
sudo mkdir $CACHE_DIR
sudo chown bao-admin:bao-admin $CACHE_DIR
sudo chmod 755 $CACHE_DIR
```
## Data storage
!!! tip "Note" This section applies only for on-premise server data
storage environments
When deploying AP in on-premise server environments, take care to
provision storage device (disk or SSD) with appropriate capacity. 500GB
is a reasonable starting point. Separate storage devices may be
provisioned for the AP software and for the data storage.
The configuration property `blobstore.root_dir` in
`bao-data-pipeline.conf` defines the root directory for data storage on
the local filesystem. It allows for storing data on a dedicated storage
device (disk or SSD). The default location is
`/var/lib/bao-data-pipeline/data`. Create the `data` directory manually.
``` sh
DATA_DIR="/var/lib/bao-data-pipeline/data"
sudo mkdir $DATA_DIR
sudo chown bao-admin:bao-admin $DATA_DIR
sudo chmod 755 $DATA_DIR
```
In the following configuration section, the blob store *container name*
will be specified per client (tenant). In an on-premise environment,
create a directory manually to represent the container using the
specified container name below the root data directory. This guide uses
`bao-ap-client-main` as the container name for the default client,
though any container name can be used. The directory should be created
in the following location.
/var/lib/bao-data-pipeline/data/bao-ap-client-main
Create the directory manually. The data and client directories should be
located on a storage medium with appropriate capacity.
``` sh
CLIENT_DIR="/var/lib/bao-data-pipeline/data/bao-ap-client-main"
sudo mkdir $CLIENT_DIR
sudo chown bao-admin:bao-admin $CLIENT_DIR
sudo chmod 755 $CLIENT_DIR
```
The data storage location can be defined with the `blobstore.root_dir`
property in the `bao-data-pipeline.conf` configuration file.
## Read me
The following content is convenient to maintain in a `readme.md` file.
``` sh
nano readme.md
```
``` sh
# Analytics Platform
## Redis
redis-cli -h 127.0.0.1
## Apache Pulsar
sudo systemctl status apache-pulsar
sudo systemctl restart apache-pulsar
sudo journalctl -n 500 -f -u apache-pulsar
## Nginx
sudo systemctl status nginx
sudo systemctl restart nginx
sudo tail -f /var/log/nginx/access.log
## Apache Superset
sudo systemctl status apache-superset
sudo systemctl restart apache-superset
sudo journalctl -n 500 -f -u apache-superset
## AP service status
sudo systemctl status bao-api-gateway
sudo systemctl status bao-identity
sudo systemctl status bao-data-pipeline
## AP service restart
sudo systemctl restart bao-api-gateway
sudo systemctl restart bao-identity
sudo systemctl restart bao-data-pipeline
## AP service logging
sudo journalctl -n 500 -f -u bao-api-gateway -u bao-identity -u bao-data-pipeline -o cat
sudo journalctl -n 500 -f -u bao-data-pipeline
```
## Debug
To adjust the log level for the Java services, append the following
parameter to the `ExecStart`property in the appropriate systemd service
file. The `com.bao` part of the parameter value refers to the package of
the classes for which the logging level will apply.
``` properties
ExecStart = /var/lib/bao-identity/bao-identity.jar --logging.level.com.bao=debug
```
# ClickHouse installation
## Installation
Consult the official ClickHouse production installation documentation
for Ubuntu / Debian Linux
[here](https://clickhouse.com/docs/en/install). ClickHouse features a
client-server architecture which are installed as separate packages.
- ClickHouse provides a default user named `default` with a password set
during the installation process. This guide uses `admin` as the
password.
- ClickHouse provides a default database named `default`.
- The main directory for ClickHouse server is `/etc/clickhouse-server`.
Set up the Debian package repository.
``` sh
sudo apt-get install -y apt-transport-https \
ca-certificates curl gnupg
curl -fsSL 'https://packages.clickhouse.com/rpm/lts/repodata/repomd.xml.key' | \
sudo gpg --dearmor -o /usr/share/keyrings/clickhouse-keyring.gpg
echo "deb [signed-by=/usr/share/keyrings/clickhouse-keyring.gpg] \
https://packages.clickhouse.com/deb stable main" | \
sudo tee /etc/apt/sources.list.d/clickhouse.list
sudo apt-get update
```
Install the `deb` packages for ClickHouse server and ClickHouse client.
Provide a password for the `default` user during installation.
``` sh
sudo apt install -y clickhouse-server clickhouse-client
```
Enable ClickHouse server on startup.
``` sh
sudo systemctl enable clickhouse-server
```
Start ClickHouse server using systemd.
``` sh
sudo systemctl start clickhouse-server
```
Verify the status of the ClickHouse process.
``` sh
sudo systemctl status clickhouse-server
```
## Access control
By default, SQL-driven access control and account management is disabled
in ClickHouse. Access control can be configured by adding new
configuration files to directory `/etc/clickhouse-server/users.d`. To
enable SQL-driven access control for the `default` user, and to add the
`default` and `baoanalytics` users to the default profile, add the
following file.
sudo nano /etc/clickhouse-server/users.d/users.xml
Specify the following content in XML format.
``` xml
1
1
1
1
3
default
```
Set file ownership.
``` sh
sudo chown clickhouse:clickhouse /etc/clickhouse-server/users.d/users.xml
```
Restart the service to have the changes take effect.
``` sh
sudo systemctl restart clickhouse-server
```
### Password type
Verify that the password type is set to `sha256_password`
sudo cat /etc/clickhouse-server/config.xml | grep ""
### Database and admin user
To create a new database called `baoanalytics`, enter the ClickHouse
client.
``` sh
clickhouse-client
```
Execute the following SQL statement to create the database.
``` sql
create database baoanalytics;
```
Create a new admin user called `baoanalytics` with password
`mypassword`, associated with the default profile, with the following
SQL statement. Replace `mypassword` with a strong password, and take
note securely.
``` sql
create user baoanalytics identified by 'mypassword' profile default;
```
``` sql
grant all on *.* to baoanalytics with grant option;
```
Note the importance of the association with the default profile, which
ensures that the configuration settings in a following section take
effect.
After an admin user is created, SQL-driven access control can be removed
from the default user for security purposes.
## Performance tuning
Memory allocations, caching and oncurrency should be adjusted to the
available server resources. Set server-wide global settings by adding
the following file and content.
sudo nano /etc/clickhouse-server/config.d/performance.xml
Specify the following content in XML format. The size unit is bytes.
Audit logging is disabled as it typically generates very large amounts
of data.
``` xml
4294967296
104857600
100
100
0
1073741824
```
Set file ownership.
``` sh
sudo chown clickhouse:clickhouse /etc/clickhouse-server/config.d/performance.xml
```
Set user-specific settings by editing the existing `users.xml` file
previously created and adding the following content.
sudo nano /etc/clickhouse-server/users.d/users.xml
``` xml
4294967296
2147483648
2147483648
10485760
1
134217728
1
```
A convenient GB-to-byte mapping table is found below.
GB Bytes
---- ------------
1 1073741824
2 2147483648
3 3221225472
4 4294967296
5 5368709120
6 6442450944
Restart service for changes to take effect.
``` sh
sudo systemctl restart clickhouse-server
```
## Logging
View ClickHouse log files.
tail -f /var/log/clickhouse-server/clickhouse-server.log
tail -f /var/log/clickhouse-server/clickhouse-server.err.log
View ClickHouse journal log.
sudo journalctl -f -u clickhouse-server
# Apache Superset Installation
This guide explains how to install Apache Superset using the `pip`
package installer for Python on Ubuntu 22.04. The source installation is
efficient in terms of required memory server resources, and is
preferrable in an on-premise environment.
The guide assumes that a `bao-admin` user exists, and that PostgreSQL,
Redis and nginx are installed.
## PostgreSQL
Create a user and database for Superset. Switch to the postgres user and
connect to PostgreSQL with the psql command-line tool.
sudo su postgres
psql
Create the PostgreSQL user for Superset with a strong password. Take
note of the password.
``` sh
create user superset with password 'mypassword';
```
Create the PostgreSQL database for Superset and exit the command-line
tool.
``` sh
create database superset with owner superset encoding 'utf8';
```
*Optional:* Verify that PostgreSQL is running and the database is
accessible as the `superset` user.
``` sh
psql -d superset -U superset -h 127.0.0.1
```
## Python
Install Python 3 and OS dependencies from the Ubuntu package repository.
sudo apt update && sudo apt upgrade -y
``` sh
sudo apt-get install build-essential libssl-dev libffi-dev python3-dev \
python3-venv python3-pip libsasl2-dev libldap2-dev libpq-dev
```
Verify the Python version.
``` sh
python3 -V
```
Upgrade `pip`.
``` sh
pip3 install --upgrade pip
```
Create an installation directory.
``` sh
sudo mkdir -p /var/lib/apache-superset
```
``` sh
sudo chown bao-admin:bao-admin /var/lib/apache-superset
```
Create virtual environment in the installation directory.
``` sh
cd /var/lib/apache-superset
```
``` sh
python3 -m venv venv
```
Activate the virtual environment
``` sh
source venv/bin/activate
```
Verify the Python and pip versions in the virtual environment.
``` sh
python -V
```
``` sh
pip -V
```
!!!note Do not change the location of the virtual environment after
installation.
## Apache Superset
### Installation
Install Apache Superset, Python packages and the ClickHouse database
driver.
``` sh
pip install apache-superset psycopg2 gunicorn gevent flask_cors pillow
```
``` sh
pip install clickhouse-connect
```
Other relevant driver packages, like Redshift and MS SQL, can be also be
installed if required.
``` sh
pip install sqlalchemy-redshift pymssql
```
### Configuration
Generate a secret encryption key for the Superset config file.
``` sh
openssl rand -base64 42
```
Create a config file named `superset_config.py` in the root Superset
installation directory with the following configuration content. Note
that the config file should be located in the root directory, *not* the
`venv` directory.
``` sh
nano superset_config.py
```
Adjust the required configuration values to the environment.
- Set `SECRET_KEY` to the previously generated secret key.
- Set `` for the the `SQLALCHEMY_DATABASE_URI` property to
the previously created PostgreSQL password.
``` properties
# Number of worker threads
SUPERSET_WORKERS = 4
# Gunicorn server port
SUPERSET_WEBSERVER_PORT = 8089
# Enable logging to file
ENABLE_TIME_ROTATE = True
# Encryption key
SECRET_KEY = 'mykey'
# SuperSet PostgreSQL metadata database connection
SQLALCHEMY_DATABASE_URI = 'postgresql://superset:@localhost/superset'
# Caching with Redis
CACHE_CONFIG = {
'CACHE_TYPE': 'redis',
'CACHE_DEFAULT_TIMEOUT': 3600,
'CACHE_KEY_PREFIX': 'superset_results',
'CACHE_REDIS_URL': 'redis://localhost:6379/0',
}
# Flask-WTF flag for CSRF
WTF_CSRF_ENABLED = False
TALISMAN_ENABLED = False
CSRF_ENABLED = False
# Add endpoints that need to be exempt from CSRF protection
WTF_CSRF_EXEMPT_LIST = []
# A CSRF token that expires in 1 year
WTF_CSRF_TIME_LIMIT = 60 * 60 * 24 * 365
# Set this API key to enable Mapbox visualizations
MAPBOX_API_KEY = ''
# Enable CORS to allow embedded dashboards
ENABLE_CORS = True
ALLOW_ORIGINS = ['http://localhost:8089']
CORS_OPTIONS = {
'supports_credentials': True,
'allow_headers': ['*'],
'resources':['*'],
'origins': ALLOW_ORIGINS
}
# Disable CSP due to bug in Superset
TALISMAN_ENABLED = False
# Enable proxy headers to support nginx
ENABLE_PROXY_FIX = True
# Enable embedded dashboards
FEATURE_FLAGS = {
"EMBEDDED_SUPERSET": True,
"DASHBOARD_RBAC": True,
"EMBEDDABLE_CHARTS": True
}
# Dashboard embedding
GUEST_ROLE_NAME = "Gamma"
```
Set ownership and permissions.
``` sh
sudo chown bao-admin:bao-admin superset_config.py
```
``` sh
sudo chmod 644 superset_config.py
```
Initialize the PostgreSQL database and create an initial Superset admin
user by invoking the following commands. Take note of the provided
username and password.
``` sh
# Set required environment variables
export FLASK_APP=superset
export SUPERSET_CONFIG_PATH=/var/lib/apache-superset/superset_config.py
# Run database migrations
superset db upgrade
# Initialize database
superset init
# Create admin user
superset fab create-admin
```
*Optional:* Run Superset with Gunicorn to verify the installation.
``` sh
gunicorn -w 10 -k gevent -t 120 -b 127.0.0.1:8089 "superset.app:create_app()"
```
The virtual environment can now be deactivated.
``` sh
deactivate
```
### Reset password
The following commands can be used in the event of needing to reset the
password for a user, e.g. the `bao-admin` user.
``` sh
# Set required environment variables
export FLASK_APP=superset
export SUPERSET_CONFIG_PATH=/var/lib/apache-superset/superset_config.py
# Reset password for admin user
superset fab reset-password --username bao-admin
```
### Upgrade
To upgrade Superset when a new version is available, navigate to the
Superset installation directory and activate the virtual environment.
``` sh
source venv/bin/activate
```
Upgrade the Superset version by executing the command below.
``` sh
pip install apache-superset --upgrade
```
Upgrade the database schema by running required migrations, if any.
``` sh
# Set required environment variables
export FLASK_APP=superset
export SUPERSET_CONFIG_PATH=/var/lib/apache-superset/superset_config.py
# Run database migrations
superset db upgrade
```
Deactivate the virtual environment.
``` sh
deactivate
```
Restart the `systemd` Superset service.
### Systemd
Create a `systemd` service file for Superset called
`apache-superset.service`.
``` sh
nano apache-superset.service
```
``` sh
[Unit]
Description = Apache Superset
After = network.target
[Service]
Type = simple
User = bao-admin
Environment = 'FLASK_APP=superset'
Environment = 'SUPERSET_CONFIG_PATH=/var/lib/apache-superset/superset_config.py'
ExecStart = /var/lib/apache-superset/venv/bin/gunicorn -w 10 -k gevent -t 120 -b 127.0.0.1:8089 "superset.app:create_app()"
Restart = on-failure
RestartSec = 5s
[Install]
WantedBy=multi-user.target
```
Set ownership, permissions and move the init script to the `systemd`
service directory.
``` sh
sudo chown root:root apache-superset.service
```
``` sh
sudo chmod 644 apache-superset.service
```
``` sh
sudo mv apache-superset.service /etc/systemd/system/
```
Reload the systemd daemon.
``` sh
sudo systemctl daemon-reload
```
Enable Superset on boot.
``` sh
sudo systemctl enable apache-superset
```
Start Superset.
``` sh
sudo systemctl start apache-superset
```
View status.
``` sh
sudo systemctl status apache-superset
```
View the logs.
``` sh
sudo journalctl -n 500 -f -u apache-superset
```
## nginx
Configure nginx by creating a configuration file `apache-superset.conf`.
Requests will be proxied to Gunicorn, which will be set up later. This
guide assumes that SSL and certificates are configured.
``` sh
nano apache-superset.conf
```
Configure a Superset server.
- SSL and certificate configuration are left out, and should be
configured appropriately.
- Additional security hardening may be appropriate in a production
environment.
- Update `server_name` from `superset.mydomain.org` to match your
environment.
``` nginx
# Redirect HTTP to HTTPS
server {
listen [::]:80;
listen 80;
server_name superset.mydomain.org;
access_log off;
log_not_found off;
return 301 https://$host$request_uri;
}
# HTTPS server
server {
listen [::]:443 ssl;
listen 443 ssl;
server_name superset.mydomain.org;
# Proxy requests to Gunicorn on port 8089
location / {
proxy_pass http://127.0.0.1:8089/;
proxy_redirect off;
proxy_set_header host $host;
proxy_set_header x-real-ip $remote_addr;
proxy_set_header x-forwarded-for $proxy_add_x_forwarded_for;
proxy_set_header x-forwarded-proto $scheme;
proxy_set_header x-forwarded-port $server_port;
}
}
```
Set ownership, permissions and move config file to correct location.
``` sh
sudo chown root:root apache-superset.conf
```
``` sh
sudo chmod 644 apache-superset.conf
```
``` sh
sudo mv apache-superset.conf /etc/nginx/sites-available/
```
Enable the server configuration by creating a symlink to the nginx
`sites-enabled` directory.
``` sh
sudo ln -s /etc/nginx/sites-available/apache-superset.conf \
/etc/nginx/sites-enabled/apache-superset.conf
```
Restart nginx to make changes take effect.
``` sh
sudo systemctl restart nginx
```
## Setup
This section provides various tips for how to set up Apache Superset.
### ClickHouse
This section assumes that ClickHouse has been installed on the same
machine and configured per the instructions in the middleware
installation guide. To set up a ClickHouse data warehouse connection:
- Click **Database** in the top-right corner.
- Under **Supported databases**, select **ClickHouse Connect
(Superset)**.
- In the basic form, specify the following values.
- *Host:* 127.0.0.1
- *Port:* 8123
- *Database name:* baoanalytics
- *Username:* baoanalytics
- *Password:* *Use password from installation*
- *Display name:* Analytics Platform - ClickHouse
- In the advanced form, in the **Performance** tab, specify the
following values.
- *Chart cache timeout:* 900 (or adjust as preferred)
- *Schema cache timeout:* 1
- *Table cache timeout:* 1
- Click **Finish**.
### Apache Superset
Various considerations when configuring Apache Superset are described
below.
- **Database connection cache:** For databases, the database schema and
table metadata will by default be cached indefinitely. This means that
if you add new schemas, tables and columns in the database after
creating the database connection, they will not be reflected in the
UI. Hence, the schema and table cache timeout values may be set to 1.
- **Data sets cache:** When creating datasets, in the add new dataset
screen, the list of schemas and tables in the respective drop-downs
may not refresh properly. To force a refresh, click the **Force** icon
next to each drop-down.
- **User roles:** For user roles, ensure that the *Public* role does not
have any permissions, and importantly does not have the *can read on
dashboard* and *can read on chart* permissions. If granted, API
requests to the `/api/v1/dashboards/` endpoint will return no
dashboards, which prevents embedded dashboards from working properly.
# DHIS2 Superset Gateway installation
This guide covers the installation of the DHIS2 Superset Gateway
service. The DHIS2 Superset Gateway is a backend service and API for
connecting DHIS2 and Apache Superset.
The gateway provides access control for DHIS2 external dashboards and
access and guest tokens for embedded dashboards in Superset. External
dashboards are stored in the DHIS2 data store using the DHIS2 data store
API.
The service *key* is `dhis2-superset-gateway`. The service *port* is
`8092`.
This guide assumes that a dedicated user for running the service called
`bao-admin` exists.
## JAR file
The service is available as an executable JAR file. The filename is
`dhis2-superset-gateway.jar`.
The JAR file should be installed in the following location.
/var/lib/dhis2-superset-gateway/dhis2-superset-gateway.jar
Create the directory manually and make `bao-admin` the owner.
``` sh
sudo mkdir /var/lib/dhis2-superset-gateway
```
sudo chown bao-admin:bao-admin /var/lib/dhis2-superset-gateway
Place the JAR file in the previously created directory and make
`bao-admin` the owner.
sudo cp dhis2-superset-gateway.jar /var/lib/dhis2-superset-gateway
sudo chown bao-admin:bao-admin /var/lib/dhis2-superset-gateway/dhis2-superset-gateway.jar
## Systemd
The *systemd* service manager is used to manage the service process.
The systemd service file should be located in the `/etc/systemd/system`
directory.
/etc/systemd/system/dhis2-superset-gateway.service
Create the system service file with the following content.
``` sh
sudo nano /etc/systemd/system/dhis2-superset-gateway.service
```
``` properties
[Unit]
Description = DHIS2 Superset Gateway service
[Service]
Environment="JAVA_OPTS=-Xms512M -Xmx1024M"
ExecStart = /var/lib/dhis2-superset-gateway/dhis2-superset-gateway.jar
User = bao-admin
[Install]
WantedBy = multi-user.target
```
To enable the services on boot, invoke the following command.
``` sh
sudo systemctl enable dhis2-superset-gateway
```
## Configuration
The service is configured with a properties file called
`dhis2-superset-gateway.properties`.
The file should reside in the following location.
/opt/dhis2-superset-gateway/dhis2-superset-gateway.properties
Create a configuration file with the following content.
``` sh
sudo mkdir /opt/dhis2-superset-gateway
```
``` sh
sudo nano /opt/dhis2-superset-gateway/dhis2-superset-gateway.properties
```
``` properties
# ----------------------------------------------------------
# DHIS2
# ----------------------------------------------------------
# Base URL to DHIS2
dhis2.base_url = https://dhis2.mydomain.org
# ----------------------------------------------------------
# Apache Superset
# ----------------------------------------------------------
# Base URL to Superset
superset.base_url = https://superset.mydomain.org
# Username for Superset user account
superset.username = myusername
# Password for Superset user account (confidential)
superset.password = xxxx
# ----------------------------------------------------------
# CORS
# ----------------------------------------------------------
# Origins from which to allow CORS
cors.allowed_origins = http://localhost:3000,\
http://localhost:9000,
```
## Proxy
The service provides API endpoints. To make the API endpoints
accessible, an HTTP proxy must be set up.
This is typically done by specifying a *location* block in *nginx*. In
the nginx configuration file for DHIS2, immediately before the location
block for DHIS2 itself, specify a location block for the DHIS2 Superset
Gateway service.
``` nginx
server {
# ..
# DHIS2 Superset gateway
location /superset-gateway/ {
proxy_pass http://127.0.0.1:8092/superset-gateway/;
proxy_set_header Host $host;
proxy_set_header X-Real-IP $remote_addr;
proxy_set_header X-Forwarded-For $proxy_add_x_forwarded_for;
proxy_set_header X-Forwarded-Proto $scheme;
proxy_set_header X-Forwarded-Port $server_port;
}
}
```
## Logging
The service uses the *journalctl* tool to view logs. To view log output,
invoke the following command.
``` sh
sudo journalctl -n 500 -f -u dhis2-superset-gateway
```
## Start
The service is started by invoking the following command.
``` sh
sudo systemctl start dhis2-superset-gateway
```
## Stop
The service is stopped by invoking the following command.
``` sh
sudo systemctl stop dhis2-superset-gateway
```
# Analytics Platform configuration
This guide covers the configuration of the Analytics Platform (AP)
software.
## Default client and user account
AP features a multi-tenant architecture, which means at least one
*client* (tenant) must be created in order to use the software. The
first time AP is deployed and started, a default client and default user
account will be inserted into the database.
### Default client
Property Value
---------- -------------
UID WxMvtZb9eNP
Code ADMIN
Name Admin
The default client can be renamed, alternatively, a new client can be
created and the default client can be removed.
### Default user account
Property Value
---------- ---------------
UID Xk6Gfr24Rj7
Username administrator
Password Admin_1234
Name Admin
!!! note Change the password of the default user after logging in from
profile menu and change password.
It is required to change the password of the default user account after
logging in for the first time, and before making AP available on the
network, as the default password is publicly known.
## Data pipeline config
The configuration of the infrastructure/cloud provider, the data storage
and the data warehouse to for AP is referred to as the *data pipeline
config*. The data pipeline config can be specified using the API or
using the web UI.
### Environments
The following infrastructure environments are supported.
Infrastructure Data storage Data warehouse
---------------- -------------------- -----------------
AWS Amazon S3 Amazon Redshift
AWS Amazon S3 ClickHouse
Azure Azure Blob Storage SQL Database
Azure Azure Blob Storage Synapse
On-prem Local filesystem ClickHouse
On-prem Local filesystem SQL Server
On-prem Local filesystem PostgreSQL
Configuration of AWS and Azure cloud environments can be done in several
ways, is well covered in online guides. It is hence considered outside
the scope of this guide, which will address on-premise deployments using
the local filesystem as blob store (data storage) and ClickHouse or
PostgreSQL as the data warehouse.
### UID
The UID format specification is as follows:
- Is exactly 11 characters long
- Contains only uppercase letters, lowercase letters and digits
- Starts with a letter
### Properties
The following properties are required for the data pipeline config. The
`blobStoreConfig` and `dataWarehouseConfig` objects are required. The
`publicHostname` property is optional and can be used in situations
where AP should connect to the data warehouse using a local IP address,
while external clients should connect using a public hostname. The
`supersetConfig` object is optional, and refers to an integrated
instance of Apache Superset.
| Property \| Description \| Value \|
| client \| Client identifier \| UID \|
| provider \| Infrastructure provider, cloud provider/on-premise
environment and data warehouse platform. \| `AWS_REDSHIFT`,
`S3_CLICKHOUSE`, `AZURE_SQL_SERVER`, `AZURE_SYNAPSE`,
`LOCAL_CLICKHOUSE`, `LOCAL_SQL_SERVER`, `LOCAL_POSTGRESQL` \|
| blobStoreConfig \| Configuration for blob store, i.e. data storage
environment \| Object \|
| identity \| AWS: Access key. Azure: Storage account name. On-prem: NA.
\| String \|
| credential \| AWS: Secret key. Azure: Storage account key. On-prem:
NA. \| String \|
| container \| AWS: Bucket name. Azure: Container name. On-prem: Root
directory name. \| String \|
| account \| Azure: Storage account name. AWS and on-prem: NA. \| String
\|
| dataWarehouseConfig \| Data warehouse configuration \| Object \|
| hostname \| Data warehouse hostname \| String \|
| publicHostname \| Data warehouse public hostname (optional) \| String
\|
| database \| Database name \| String \|
| username \| Data warehouse admin account username \| String \|
| password \| Data warehouse admin account password \| String \|
| iamRoleArn \| AWS: Redshift IAM role ARN. Azure and on-prem: NA. \|
String \|
| supersetConfig \| Apache Superset configuration (optional) \| Object
\|
| url \| Superset domain name \| String \|
| username \| Superset username \| String \|
| password \| Superset password \| String \|
| databaseId \| Superset AP database identifier \| Integer \|
### API configuration
The data pipeline config can be configured using the API:
``` http
POST /api/dataPipelineConfig
```
``` properties
Content-Type:application/json
```
The configuration payload in JSON format using local filesystem for data
storage and ClickHouse as data warehouse can be defined as below. Value
`na` refers to "not applicable". Under `blobStoreConfig`, field
`bao-ap-client-main` refers to the directory below the data storage
directory on the local file system.
``` json
{
"client": "TKcmL3RbA3I",
"provider": "LOCAL_CLICKHOUSE",
"blobStoreConfig": {
"identity": "na",
"credential": "na",
"container": "bao-ap-client-main"
},
"dataWarehouseConfig": {
"hostname": "127.0.0.1",
"publicHostname": null,
"database": "baoanalytics",
"username": "baoanalytics",
"password": "{secret}"
},
"supersetConfig": {
"url": "https://superset.mydomain.org",
"username": "admin",
"password": "{secret}",
"databaseId": 1
}
}
```
### Web UI configuration
The data pipeline can be be configured using the web UI. The steps
assumes being logged in as the relevant client.
- From the top-right context menu, click **Clients**.
- Select the relevant client name.
- Click **Manage data pipeline config**.
- Click **Update**.
- Enter the required values using the information above.
- Click **Update**.
An example of values to use with the local server filesystem as data
storage and ClickHouse as data warehouse in configuration form is found
below.
Field Value
--------------------------- -------------------------------
Client Prefilled
Provider Local - ClickHouse
**Blob store config**
Identity na
Credential na
Container bao-ap-client-main
Account
**Data warehouse config**
Hostname 127.0.0.1
Public hostname
Username baoanalytics
Password {secret}
IAM role ARN
**Superset config**
URL https://superset.mydomain.org
Username admin
Password {secret}
Database ID 1
### Connection test
In the web UI, the data pipeline config page offers testing the blob
store connection and the data warehouse connection.
- To test the blob store connection, click **Test blob store
connection**.
- To test the data warehouse connection, click **Test data warehouse
connection**.
- To test the Apache Superset connection, click **Test Superset
connection**.
A window will open and indicate the test outcome.
### Initialize data warehouse
The support data warehouses may require initial setup.
- To perform the work to initialize the datawarehouse, click
**Initialize data warehouse**.
If the initialization is done multiple times, the operation will fail,
but will not cause an invalid state.
# Single Sign-On (SSO) Configuration
The Analytics Platform (AP) implements a comprehensive authentication
system based on OpenID Connect (OIDC), a protocol built on top of OAuth
2.0. The system features a dual-role architecture that allows AP to
function both as an OpenID Connect client and as an authorization
server.
## OpenID Connect (OIDC)
AP leverages Spring Security's OAuth2/OpenID Connect (OIDC) support with
the following key components.
**Client implementation**
- Supports multiple identity providers per client through a multi-tenant
architecture.
- Handles standard OpenID Connect scopes: `openid`, `profile`, and
`email`.
**Authorization Server implementation**
- Provides OAuth2 authorization server capabilities through Spring
Authorization Server
- Supports standard OAuth2 grant types:
- Authorization Code
- Refresh Token
- Client Credentials
- Implements OpenID Connect endpoints:
- Authorization endpoint: `/oauth2/authorize`
- Token endpoint: `/oauth2/token`
- UserInfo endpoint: `/oauth2/userinfo`
- JWKS endpoint: `/.well-known/jwks.json`
- Supports dynamic client registration
## AP as an OAuth2 client
In this role, AP authenticates users against external identity providers
(e.g., Okta, Azure AD). This section explains how to set up an SSO
configuration using Okta as the identity provider. Okta is a popular
identity and access management platform which supports the OpenID
Connect protocol. The following describes the steps to set up AP as an
OAuth2 client.
### Create Okta app integration
In this step we will create an Okta web app integration.
- Navigate to **Applications** \> **Applications**.
- Click **Create app integration**.
- Under **Sign-in Method**, select *OIDC - OpenID Connect*.
- Under **Application type**, select **Web application**, and click
*Next*.
- Under **App integration name**, enter a descriptive name like: **BAO
Analytics Platform Integration**.
- Under **Grant type** \> **Client acting on behalf of itself**, enable
*Client Credentials*.
- Under **Client acting on behalf of a user**, make sure *Authorization
Code* is enabled and other options are disabled.
- For **Sign-in redirect URIs**, enter
`https://manager.baosystems.com/oauth2/code/OCC4TI2Fdwl/okta`. The
pattern is
`https://{ap-base-url}/oauth2/code/{ap-client-id}/{provider-key}`. The
`ap-base-url` is `manager.baosystems.com`. Make sure to replace
`ap-client-id` with the id of your organization in the AP. The
`provider-key` is the provider name in lowercase, e.g., `okta` for
Okta.
- Leave **Trusted Origins** blank.
- For **Assignments**, select *Allow everyone in your organization to
access*.
- Click **Save**.
- In the **Assignments** tab in the application overview, ensure that
the relevant people are assigned.
### Record Okta settings securely
In this step we will take note of the relevant Okta settings and
credentials.
- Go to the **General** tab in the application overview screen.
- Take note of the following settings by clicking the *Copy to
clipboard* buttons. These settings will be used to create an SSO
configuration in AP. The settings should be considered secrets and
stored in a secure way.
- Client ID
- Client secret
- Okta domain
- Log out of the Okta portal, to allow logging back in later.
### Create AP user
An AP user must be created for every Okta user that needs to log in to
AP. The AP user is mapped to the Okta identity via the AP user **SSO
Authentication ID** field. User roles and user groups can be granted to
the AP user as usual.
- Log in to AP using a regular user with authority to create users.
- Go to **Users**.
- Create a new AP user, or update an existing one.
- Check **Enable SSO** and enter your Okta username (**email**) in the
Authentication ID field that is displayed.
- Select appropriate user roles.
- Click **Save**.
### Configure SSO in AP
In this step we will configure AP to authenticate with Okta by creating
an SSO provider configuration.
- Log in to AP as an admin user (with `MANAGE_CLIENT` and
`MANAGE_SSO_PROVIDER_CONFIG` authorities).
- At the top-right of the screen, click on your username and select
**Clients** from the dropdown.
- Click on your client name.
- Select **Manage SSO Provider config**
- Enter the OKTA credentials recorded previously:
- **Provider** - Select OKTA from the dropdown.
- **SSO Client ID** - Enter the OKTA **Client ID**.
- **SSO Client Secret** - Enter the OKTA **Client Secret**.
- **SSO Client Domain** - Enter the OKTA **domain URL**.
- **Mapping Claim** - Enter **email**.
- Click **Save**.
### Nginx configuration
Update the nginx configuration as follows.
``` bash
sudo nano /etc/nginx/sites-available/analytics-platform.conf
```
Add the following location block.
``` bash
location /oauth2 {
proxy_pass http://identity/oauth2;
}
```
Restart nginx to make changes take effect.
``` bash
sudo systemctl restart nginx
```
## AP as authorization server
In this role, AP provides authentication services to other applications.
This section describes the process for configuring SSO clients for the
AP Authorization Server service. The section covers:
1. Adding SSO client configurations
2. Configuring nginx for the authorization flow requests
3. Example: Configuring DHIS2 as a client for SSO
4. Example: Configuring Apache Superset as a client for SSO
### Add SSO client configurations
The `/api/ssoClientConfig` endpoint manages client configuration details
for SSO clients. This requires the `ROLE_MANAGE_SSO_CLIENT_CONFIG` role.
**Create new SSO Client**
POST /api/ssoClientConfig
Content-Type: application/json
**Body**
``` json
{
"clientName": "data.baosystems.com",
"redirectUris": [
"https://data.baosystems.com/oauth2/code/ap"
],
"scopes": [
"openid",
"email"
]
}
```
**Response**
``` json
{
"data": {
"clientId": "OfNwxFCVvNZN2QBFHuQv",
"clientSecret": "ZfC0UyTxLZmRwa5iDYM0IQDmC2spCWFu4i8aARM9oetKsnbzLfJORZFIkj2M2ncx",
"id": "EYwkcaMMZrg"
}
}
```
!!! tip "Note" The `clientId` and `clientSecret` values are generated by
the AP server. The `clientSecret` is only shown once when the
configuration is first created.
### Configure nginx for the authorization flow requests
Nginx needs to be configured to allow authorization flow requests. As a
multi-tenant application, auth requests need to contain the tenant id in
the request. For each tenant (AP client), an OpenID Provider
Configuration Request will be:
https://manager.baosystems.com/{ap-client-id}/.well-known/openid-configuration
where `ap-client-id` is the AP tenant (AP client) id. Update the nginx
configuration as follows to allow this and other oauth requests:
``` nginx
location ~ "^/([a-zA-Z]{1}[a-zA-Z0-9]{10})/(oauth2|\.well-known/openid-configuration)(.*)$" {
set $client_id $1;
set $sub_path1 $2;
set $sub_path2 $3;
proxy_pass http://identity/$client_id/$sub_path1$sub_path2$is_args$args;
}
```
### Example: Configuring DHIS2 as SSO client
Setting up a DHIS2 instance for SSO is covered in detail in the [DHIS2
documentation](https://docs.dhis2.org/en/manage/reference/openid-connect-oidc.html#generic-providers).
In summary, the `dhis.conf` file needs to be updated as follows:
``` properties
oidc.oauth2.login.enabled = on
oidc.provider.ap.client_id = dkhY3Z6zO1qDkdL7dMBg
oidc.provider.ap.client_secret = bcSfmL8KjzvM1CTt2VmeUC1IEzxPiP0LPzGab1jr5J4rVtHtmZZ59piFBkweyi36
oidc.provider.ap.mapping_claim = email
oidc.provider.ap.authorization_uri = https://manager.baosystems.com/OCC4TI2Fdwl/oauth2/authorize
oidc.provider.ap.token_uri = https://manager.baosystems.com/OCC4TI2Fdwl/oauth2/token
oidc.provider.ap.user_info_uri = https://manager.baosystems.com/OCC4TI2Fdwl/oauth2/userinfo
oidc.provider.ap.jwk_uri = https://manager.baosystems.com/OCC4TI2Fdwl/oauth2/jwks
oidc.provider.ap.end_session_endpoint = https://manager.baosystems.com/OCC4TI2Fdwl/logout
oidc.provider.ap.scopes = openid
oidc.provider.ap.redirect_url = https://{dhis2-server-url}/oauth2/code/ap
oidc.provider.ap.display_alias = BAO Analytics Platform
oidc.logout.redirect_url = https://{dhis2-server-url}/
```
!!! tip "Note" 1. This change requires a tomcat restart. In addition, a
DHIS2 user needs to be created so match the AP user. In particular, the
**OIDC mapping value** field of the DHIS2 user must match the email of
the user in AP. Find more details in [Okta for DHIS2
guide](https://docs.dhis2.org/en/topics/tutorials/configure-oidc-with-okta.html#create-dhis-2-user).
2. The `redirect_uri` should be
`https://{dhis2-server-url}/oauth2/code/ap` and it must match the
redirect URI used to create the SSO client config in AP.
### Example: Configuring Apache Superset as SSO client
Setting up Apache Superset for SSO is described in the [Apache Superset
documentation](https://superset.apache.org/docs/configuration/configuring-superset/#custom-oauth2-configuration).
**Install `Authlib`**
Install `Authlib` pip package by adding an entry in the
`superset/docker/requirements-local.txt` file:
``` text
...
authlib
...
```
**Configure `superset_config.py`**
Edit the file `superset/docker/pythonpath_dev/superset_config.py` and
add the following lines:
``` python
from flask_appbuilder.security.manager import AUTH_OAUTH
from custom_sso_security_manager import CustomSsoSecurityManager
CUSTOM_SECURITY_MANAGER = CustomSsoSecurityManager
# Set the authentication type to OAuth
AUTH_TYPE = AUTH_OAUTH
OAUTH_PROVIDERS = [
{
'name': 'BAO-Analytics-Platform',
'token_key': 'access_token', # Name of the token in the response of access_token_url
'icon': 'fa-address-card',
'remote_app': {
'client_id': 'NHNy6W9ggLJbC89INtw6', # Created via /api/ssoClientConfig
'client_secret': 'l8mOLS8jPNxs4L0JQpsvWQVeqpPK5foBNK8MyFiKqobvgKr4DWavSyTkxVNwLCQL',
# Created via /api/ssoClientConfig
'client_kwargs': {
'scope': 'openid' # Scope for the Authorization
},
'jwks_uri': 'https://manager.baosystems.com/OCC4TI2Fdwl/oauth2/jwks', # Uri for token creation
'access_token_method': 'POST', # HTTP Method to call access_token_url
'access_token_params': { # Additional parameters for calls to access_token_url
'client_id': 'NHNy6W9ggLJbC89INtw6'
},
'access_token_headers': { # Additional headers for calls to access_token_url
'Authorization': 'Basic TkhOeTZXOWdnTEpiQzg5SU50dzY6bDhtT0xTOGpQTnhzNEwwSlFwc3ZXUVZlcXBQSzVmb0JOSzhNeUZpS3FvYnZnS3I0RFdhdlN5VGt4Vk53TENRTA==',
'Content-Type': 'application/x-www-form-urlencoded',
},
'api_base_url': 'https://manager.baosystems.com/OCC4TI2Fdwl/',
'access_token_url': 'https://manager.baosystems.com/OCC4TI2Fdwl/oauth2/token',
'authorize_url': 'https://manager.baosystems.com/OCC4TI2Fdwl/oauth2/authorize'
}
}
]
# Will allow user self registration, allowing to create Flask users from Authorized User
AUTH_USER_REGISTRATION = True
# The default user self registration role
AUTH_USER_REGISTRATION_ROLE = "Gamma"
```
!!! tip "Note" 1. The `remote_app.access_token_headers.Authorization`
value is the base64 encoding of the `client_id:client_secret`. 2. The
redirect URL will be
`https://{superset-webserver}/oauth-authorized/{provider-name}`. For the
BAO demo instance, that will be:
`https://analytics.demo.baosystems.com/oauth-authorized/BAO-Analytics-Platform`
**Configure `custom_sso_security_manager.py`**
Create a `superset/docker/pythonpath_dev/custom_sso_security_manager.py`
file with the following content:
``` python
import logging
from superset.security import SupersetSecurityManager
class CustomSsoSecurityManager(SupersetSecurityManager):
def oauth_user_info(self, provider, response=None):
logging.debug("Oauth2 provider: {0}.".format(provider))
if provider == 'BAO-Analytics-Platform':
userinfo = self.appbuilder.sm.oauth_remotes[provider].get('oauth2/userinfo').json()
# check the values of user_name, mail and others values in me variable
return {
'name': userinfo.get('name', ''),
'email': userinfo.get('sub', ''),
'id': userinfo.get('id', ''),
'username': userinfo.get('sub', ''),
'first_name': '',
'last_name': ''
}
```
### Troubleshooting
Common issues and solutions are found below.
**Invalid Redirect URI**
- Ensure the configured redirect URI exactly matches the callback URL.
- Check for trailing slashes and correct protocol (`http` vs `https`).
**Token Validation Failures**
- Check if tokens have expired.
- Validate signature keys are properly configured.
**User Attribute Mapping Issues**
- Check that the identity provider is sending the required claims.
- Verify attribute mapping configuration.
- Check scopes include necessary permissions.
# SSH tunnel for PostgreSQL connection
This guide covers how to set up an SSH tunnel to a remote server running
PostgreSQL.
## Overview
The DHIS2 data pipeline in AP benefits from a database connection to the
DHIS2 PostgreSQL database for efficient loading of huge amounts of data.
The database connection must however be set up in a secure way, and
exposing the PostgreSQL port to the outside is not recommended.
Using an SSH tunnel have several security benefits. It adds a layer of
encryption to the connection and uses public-private key authentication,
which is more secure than password-based login.
Since using an SSH tunnel requires that the public key of the AP server
is installed on the remote PostgreSQL server, it is important to create
a dedicated user with minimal authority which only has access to the
PostgreSQL service, not admin or root access.
## Configuration
The local port forwarding approach for SSH tunneling is most appropriate
type for remote connections to PostgreSQL.
### SSH
Set up the tunnel with the following command.
``` sh
ssh -fN -L 5001:localhost:5432 bao-admin@my.domain.org
```
The `-f` flag ensures the process is run in the background. The `-N`
flag prevents the command from executing the command, i.e. avoids
logging in and opening a shell. The `-L` defines the local port number
to be forwarded and the remote host and port number. The local hostname
is omitted and defaults to `localhost`. Using localhost as the remote
host leads traffic to arrive on the `localhost` address at the remote
server, meaning no changes to the PostgreSQL `pg_hba.conf` configuration
should be necessary.
### systemd
To manage the SSH tunnel, in terms of starting, stopping and enable it
on server boot, the *systemd* process managed can be used. Create a
systemd service file with a descriptive name.
``` sh
nano bao-ssh-tunnel.service
```
``` properties
[Unit]
Description = SSH Tunnel for PostgreSQL at my.domain.org
After = network.target
[Service]
ExecStart = /usr/bin/ssh -N -L 5001:localhost:5432 bao-admin@my.domain.org
User = bao-admin
Restart = always
RestartSec = 3
[Install]
WantedBy = multi-user.target
```
``` sh
sudo chown root:root bao-ssh-tunnel.service
```
``` sh
sudo mv bao-ssh-tunnel.service /etc/systemd/system
```
!!! note The `-f` flag must be omitted in the systemd file to avoid the
SSH process being deactivated
To enable the SSH tunnel on server boot.
``` sh
sudo systemctl daemon-reload
```
``` sh
sudu systemctl enable bao-ssh-tunnel
```
To start and stop the SSH tunnel
``` sh
sudo systemctl start bao-ssh-tunnel
```
``` sh
sudo systemctl stop bao-ssh-tunnel
```
## Testing
To test, first ensure that the public key of the local server is
installed at the remote server and that you can SSH into the remote
server.
``` sh
ssh user@my.domain.org
```
Exit the remote server. Now verify that you can connect to the remote
PostgreSQL instance on localhost using the port defined by the SSH
tunnel and the regular `psql` CLI syntax, where the PostgreSQL database
name is `dhis2` and the user is `dhis`.
``` sh
psql -h localhost -p 5001 -d dhis2 -U dhis
```
If the `psql` CLI returns with a password prompt, the connection is
valid.
View current SSH connections with the following command.
``` sh
sudo netstat -tpln | grep ssh
```
View current SSH processes with the following command.
``` sh
ps aux | grep ssh
```